Theban Hoplite Tutorial
It's been a while since I did a tutorial for my Corinthians. I admit, being the old geezer that I am, the tutorials mainly serve as a reminder to myself of how I painted a particular model. Since the Thebans received good feedback, I might paint more models for them in the future. Reason enough to create a little reminder...

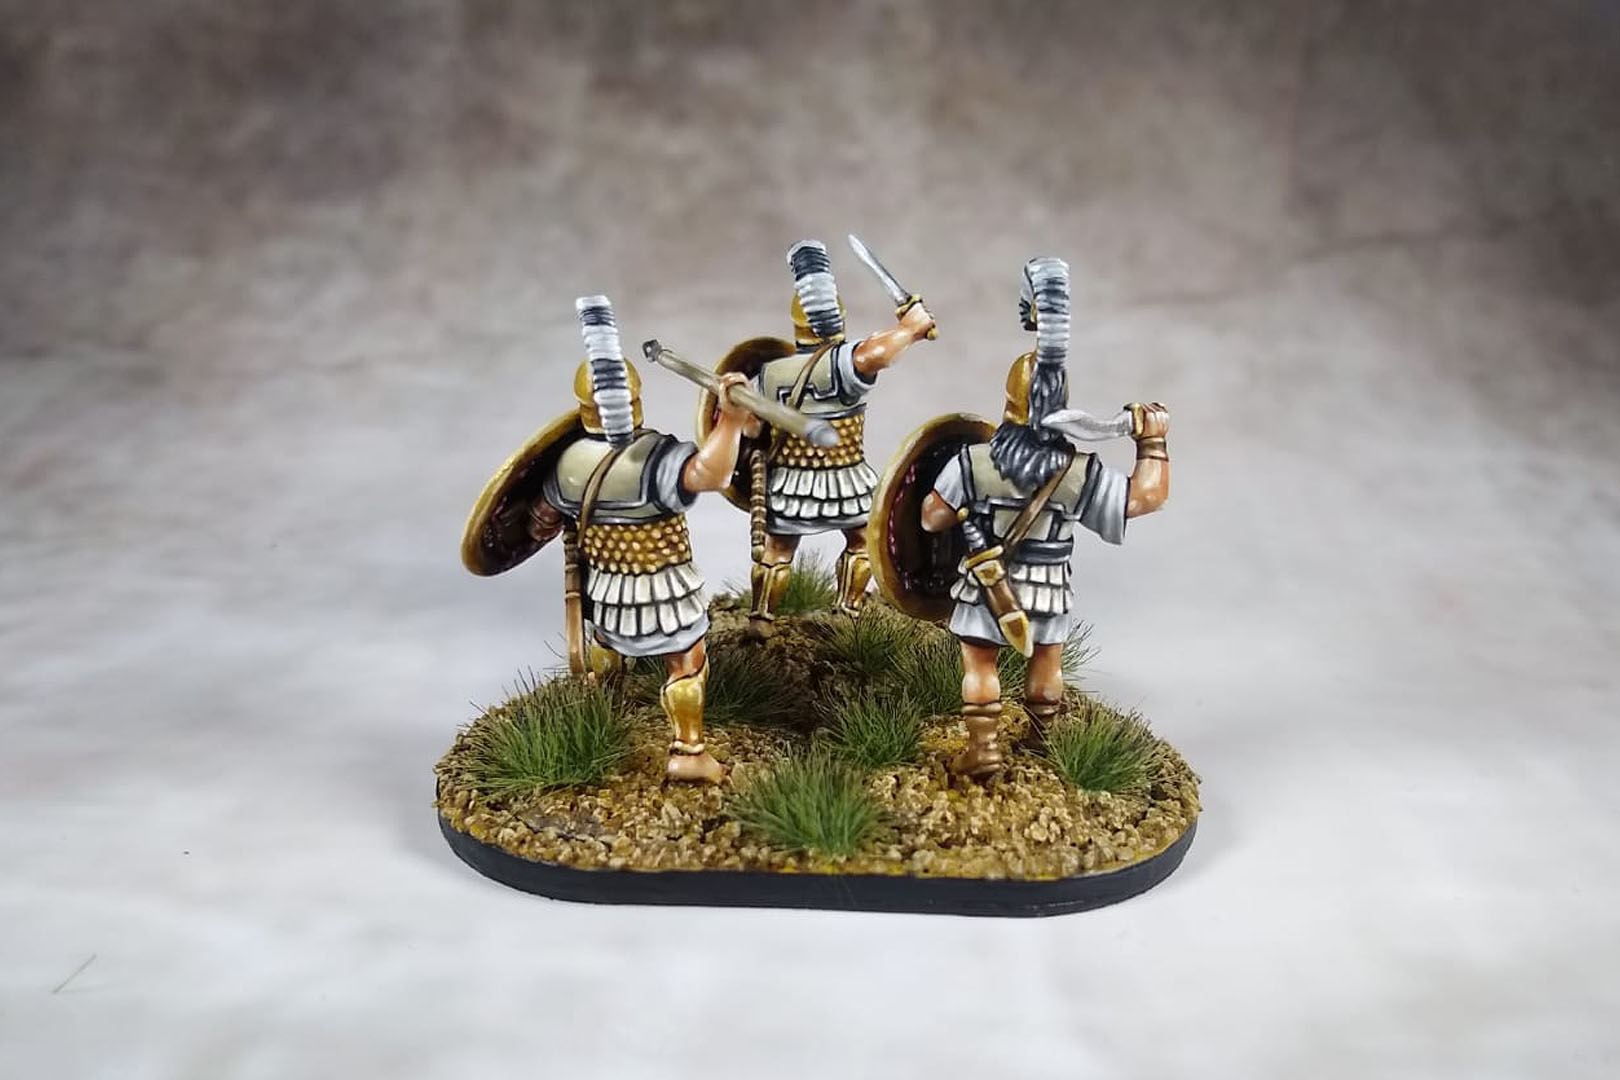

Skin
Since these are figurespurely for playing, I put less effort into the layers this time than I did with the Corinthians. The base coat consisted of Kobold Skin (Army Painter), which was highlighted in a 1:3 ratio with Bonewhite (Vallejo Game Color). Then the entire surface was washed with Flesh Wash (Two Thin Coats). However, I added some red and additional Lahmian Medium to this, because Flesh Wash is more of a brown tone than a suitable wash for skin.
The previous color was used to accentuate some of the muscles and the hands. I added pure white to this mixture, which provided the final accent. You don't need to accentuate the feet, as they are usually not visible anyway.
Tunic
The base color this time was Ash Grey (Army Painter). As usual, I highlighted by adding white, but this time I made sure not to have any too stark transitions. Then I mixed Ash Grey with a little black and Lahmian Medium to create a wash, which I used to shade the recesses. I added a little white to the final accent, so that it was almost pure white.
Linothorax
This part was a little more complicated. The base color was Bonewhite, which I had to apply in several layers to achieve good coverage. As in the previous step, I darkened the color by adding black. I repeated this step twice when necessary. The accents, on the other hand, were quite simple—I mixed white into the Bonewhite, roughly in a 1:1 ratio, and then used pure white for the edges.
The black edges were painted with Matt Black (Army Painter), which was highlighted with white as much as according to your personal preference. I really like Army Painter's black because it has a hint of blue in it. Real leather also has a slight hint of blue when it is dyed black.
By the way, this is the same method I used to paint the black parts of the helmet crest and hair or beards.
Leather
Aaaah yes. Leather. Or rather, anything that was brown in color. I've had a tried-and-tested combination here for years, and it has never let me down. The base color is Beasty Brown (Army Painter), which was first shaded twice with a black mixture into the base color. To fix any major painting mistakes, I touched it up a bit with the original color. I then highlighted it by adding Bonewhite and finally white.
This combination works like clockwork. Almost all shades of brown can be used comfortably in this way.
Crest
I already mentioned the black areas. For the white areas, I used Ash Grey as the base color again, which was highlighted twice with white. Make sure to paint the entire hairline first, then only half, and then only a third. The final accent in pure white is only applied to the edge of the helmet crest.
Bronze and iron
As so often, I used my fake metal method here – the base color was Polished Gold mixed with Heavy Gold Brown (both Vallejo Game Color). This gives the base color a little more coverage. I mixed in a touch of silver and roughly accentuated it. The whole thing was then washed with Agrax Earthshade (Games Workshop). I accentuated by adding a little Mithril (Vallejo Air Brush) again and by tracing the edges. Another accent followed by adding white, followed by a dot of pure white where you would expect a reflection or a “sparkle.” You have to be a little more careful with the edge highlights so that the lines don't become too thick.
Blades and spearheads were painted quite simply – the base color was Mithril, which was washed once or twice with Oblivion Black (Two Thin Coats). I don't consider this to be the best wash either, as it is more gray than black. If necessary, simply mix in a touch of black. The edges were then painted with a Mithril White mix. Here, too, I added a white dot to the edges.
Base
For game pieces, I usually keep the painting simple. The glued-on sand was washed with Sepia Wash (Vallejo). You will definitely need to add some water here, as Vallejo Washes tend to be more opaque than Thin Coats Washes. Then the base was drybrushed with Bone White and the edge was painted black.
Decorative colors
And that's it. Basically, you can now start playing with the minis. Decorative colors can be painted according to your own taste. For example, I did this with the cords, which had a red base color, a black wash, and were then highlighted twice with red + white, but as I said, you can use pretty much any color as a decorative color.
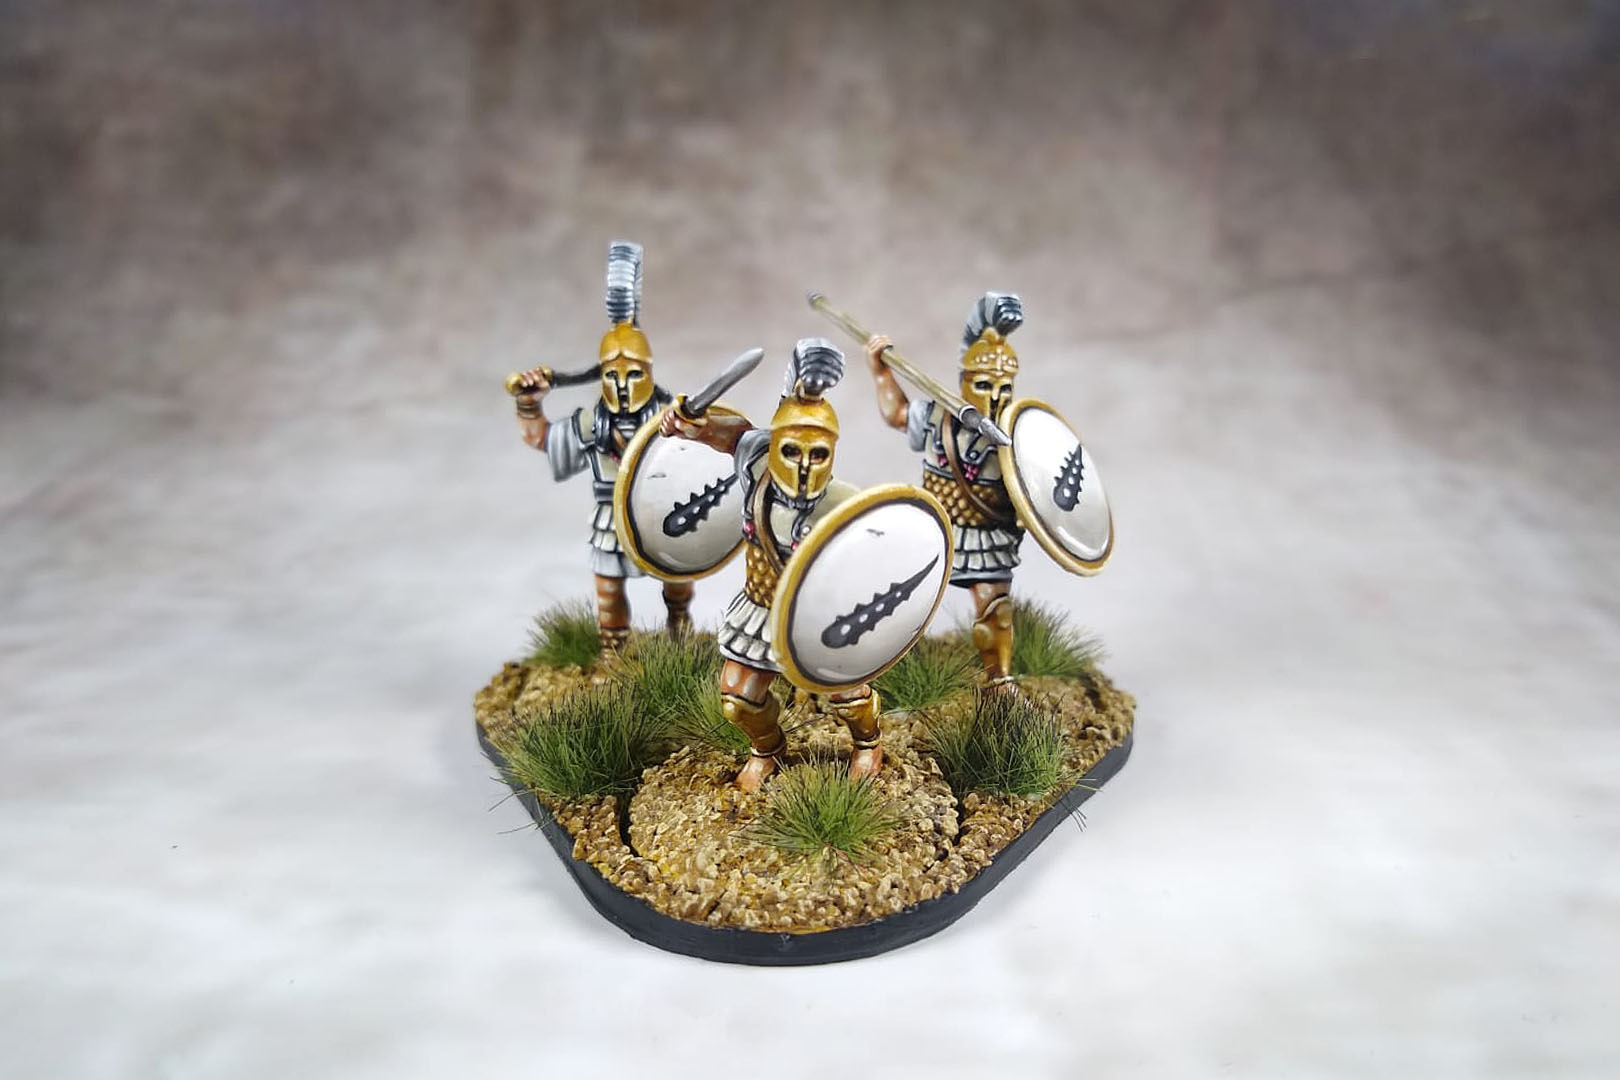
Shields
Here, I will only discuss the emblem, as the white was painted like the other white areas. Freehands in the form of pictograms are easier to paint if you break them down into simple shapes.
In the case of the club of Hercules, a typical heraldic symbol in Thebes, this means extending the basic shape of a simple line with two additional lines that taper to a point. Then the curve of the club's end is painted on. To represent the spikes, it is sufficient to add small black triangles and, finally, to place white dots at the same height.
I usually brighten the black a little before doing this, but that's an optional step.
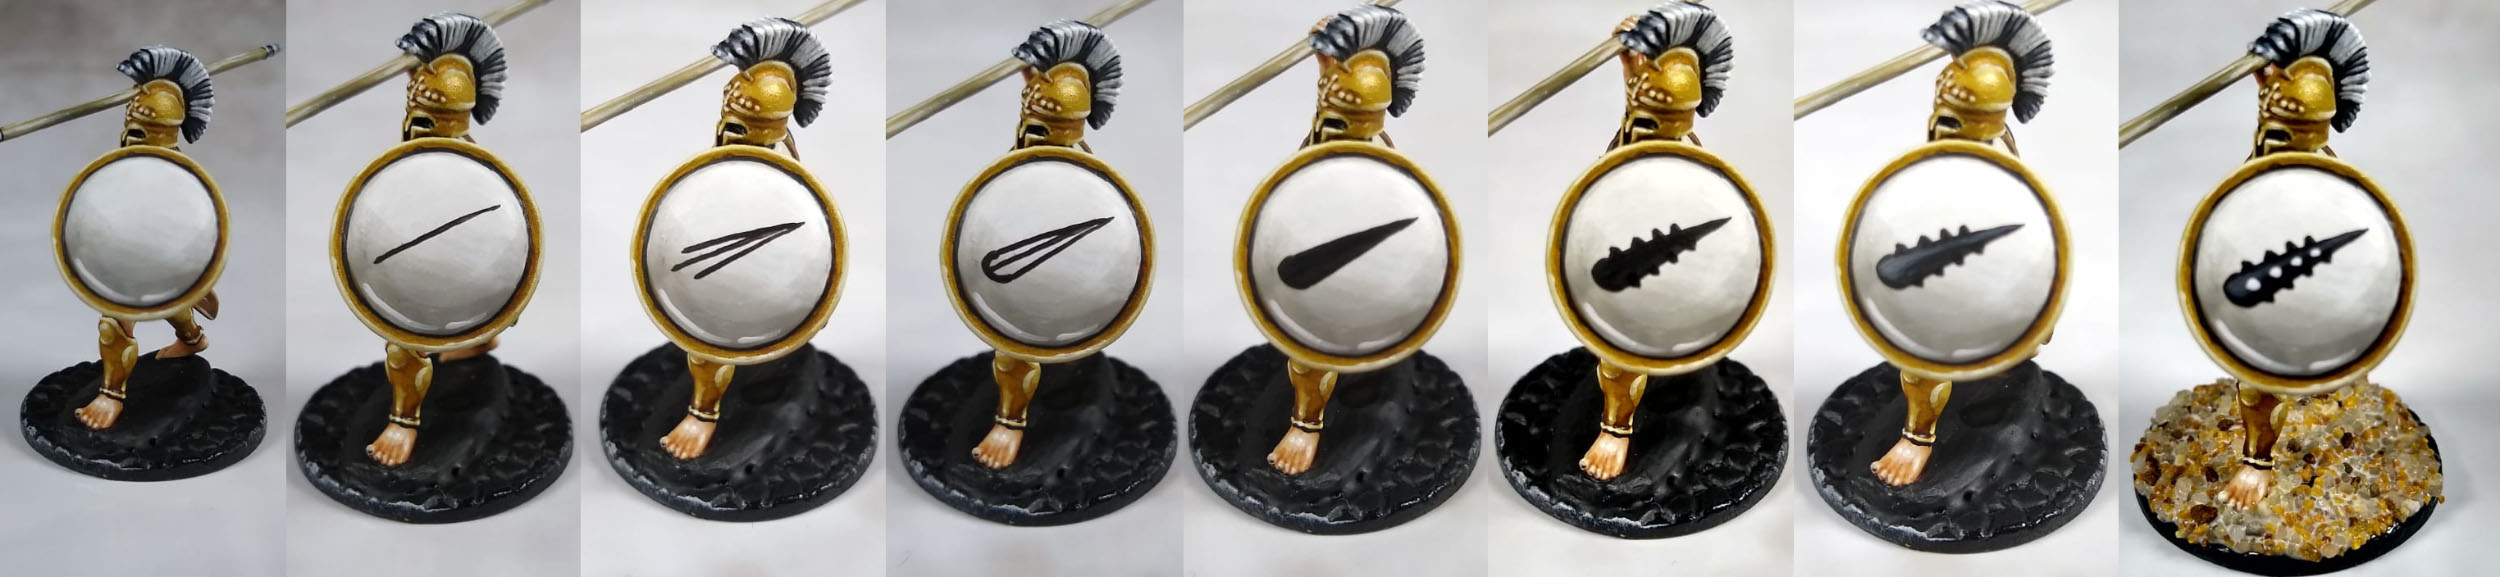
Don't worry too much about whether the lines are straight or not; in ancient times, they were also painted by hand, so no emblems were ever exactly alike.
Allright, I hope you try it out and share your results with us.
Until then, greetings from the Chaosbunker
Dino
Enjoy this article?
Like us on Facebook

Follow me on Instagram

Categories
- events (201)
- fantasy (590)
- General (160)
- historical (628)
- Little Big Adventures (4)
- offtopic (5)
- reviews (531)
- science fiction (665)
- showroom (101)
- terrain (114)
- work-in-progress (413)


Leave a Reply